
Introduction to bow hunting

The bow, in its most basic form has been around for almost as long as humans have had weapons. In fact, there are examples of primitive bow having been found which date from the Stone Age, a period of history that started approximately two and a half million years ago!
Of course the first bows and arrows were exceptionally primitive by modern standards. Early bows are believed to have been made from elm and had a flat front with a D shaped section which would today look like you were firing your bow backwards.
However, the bow was an extremely effective weapon. It was used by the Native Americans; in fact, almost every nation in the world has a history of bows being created at some point. Early bows may have been primitive but their operators were experts at getting close to their prey; something that can still be learned from you. Even with the best modern bows in the world you still need to be able to get close to your target without alerting them.
Bows and arrows have also featured in a great many military campaigns over the years. They are more effective and accurate than spears and can quickly and easily be reloaded to provide continual defense.
Archery as a sport as opposed to a military technique first became popular in the late nineteenth century, although the first archery club in America was actually established as long ago as 1828.
Prior to this it had been in decline as it was no longer effective on the battlefield; the advent of firearms quickly made the traditional bow and arrow redundant. The early part of the nineteenth century saw a valiant effort by the noblemen in established countries such as Great Britain, to make it a sport reserved for the nobility.
Ultimately the sport came back into fashion at the beginning of the twentieth century and was even included in the Olympics for several years before being omitted until the mid twentieth century. Since then it has been in every Olympic Games and there has been a dramatic increase in the number of people shooting a bow and arrow. The majority of these people simply shoot to learn and improve their skill. However, some of them are interested in following in the ways of the original archers and learning to hunt with just a bow, arrow and skill.
This is a challenging sport to learn although the rewards can be great. It is essential to know which the right equipment is for your shooting style, and the animal you are attempting to shoot. This article will guide you through the types of bow available and how to choose the right one. You will also learn how to set up and use your bow and arrow as well as some essential hunting tips.
Click on the below infographic to view it in full size
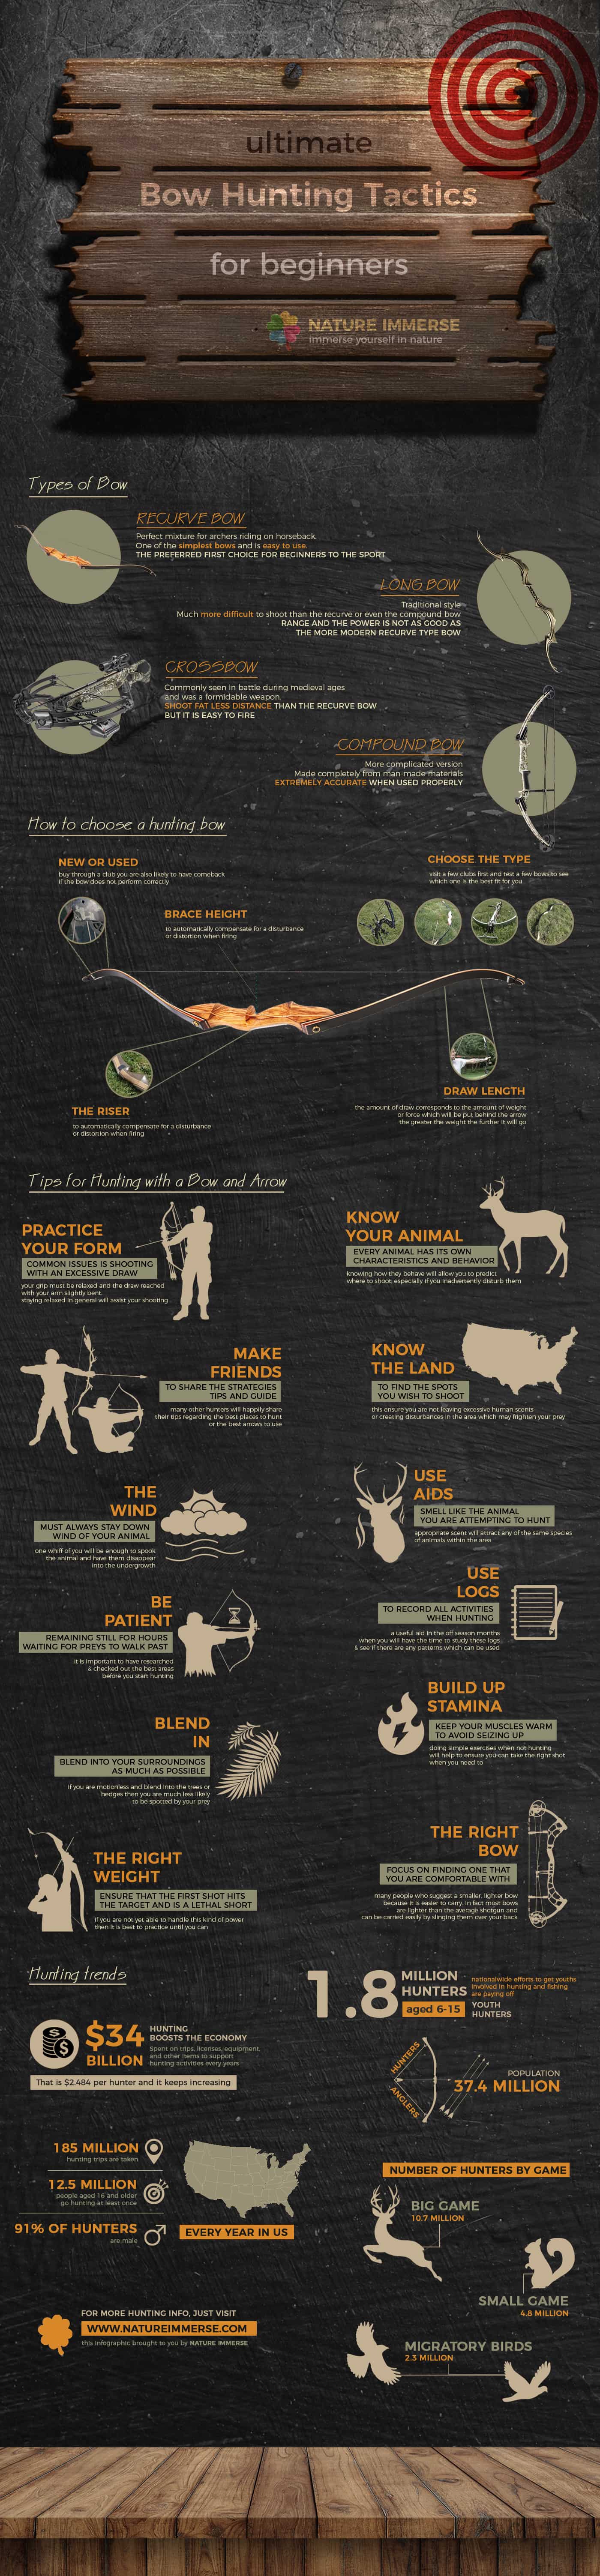
Types of Bow
It may surprise you to know that there are actually four different types of bow. All of these bows can be used for hunting but there are some benefits to knowing the different types and which one is best suited to your shooting style. The four main types are:
1. The Recurve Bow

This is perhaps the one you will be most familiar with. It comes in four parts. The middle section is the piece you hold and this is known as the Riser. Attached to this, one on each side are the limbs and the string stretches between the limbs.
It is usual for the riser to be shaped into a comfortable hand grip and for there to be space for attachments; these include sights and weights to help stabilize the bow when you shoot. These are the only bows allowed in the Olympics.
A proper recurve bow will have limbs which curve towards you and the tips of the limbs will curve away. The reason for this is to provide more power in a short bow whilst needing less physical strength to actual pull the string back.
This was the perfect mixture for archers riding on horseback which is why this type of bow first came into existence.
The recurve is also one of the simplest bows and is very easy to use. It is also the preferred first choice for beginners to the sport as you can start by shooting without a sight or any other extras, simply to get a feel for the bow. Adding the sight and other parts can be completed as you progress.
2. The Compound Bow

This is a much more complicated version of the bow. The actual bow is generally shorter than the recurve but the bow will have a complicated system of pulleys, cables and cams.
These work together to hold a load once you have pulled it. In essence you will require much more strength to pull the bow back than you would for a recurve. However, once it has been pulled back you will be able to hold it indefinitely.
This type of bow is made completely from man-made materials and, as such, is much less likely to be affected by any changes in temperature or humidity; a factor which can be an issue for traditional recurve bows. The compound bow is also extremely accurate when used properly. It is not generally recommended for anyone new to the sport as it is not the easiest bow to get to grips with.
It is worth noting that once the bow has been drawn there is nothing to do but wait until you are ready to release it. This means you will have time on your side to spot and aim for your target.
3. The Longbow

This is a more traditional style bow; they are generally taller than you and are made of one piece. As with the recurve they are shaped in the traditional style of a bow. However, the long bow is much more difficult to shoot than the recurve or even the compound bow.
A proper longbow will not have any place to rest your arrow or even have a sight. You will simply need to know you are aiming at, rest the arrow on your hand and fire accordingly. This is the most difficult bow to learn to fire; it will take plenty of time and oodles of patience.
The bows are also shaped as a traditional ‘D’ but they do not have apiece at the tip of the limb which curves away from you. This means that their range and the power behind them is not as good as the more modern recurve type bow. Learning to use one of these effectively is a real skill!
4. The Crossbow

This type of bow has been dated back to the medieval ages; in fact it was commonly seen in battle during this period and was a formidable weapon. The modern cross bow has a gun style mechanism with two short limbs attached to the centre to create a bow shape.
The arrow is locked into the clip as the string is pulled; it cannot then go anywhere unless you press the trigger. The string is relatively easy to pull and it is this which locks everything together until you are ready to shoot. It is not advisable to leave the bow loaded and untended.
The cross bow is typically able to shoot far less distance than the recurve bow but it is easy to fire and can be an effective weapon if required.
It is possible to learn how to fire all of these. However some are better suited to hunting than others. If you are looking to choose a hunting bow then there is some important information to note; this will ensure you pick the best bow for your needs.
Setting Up & Using Your Bow & Arrow

Choosing your bow and arrow is important; the right combination can make a huge difference to your success rate.
However, once you have chosen you will need to ensure you are familiar with the features of your bow and the right arrows to use for both your bow and the animals you are likely to be hunting.
The compound bow still has a middle section which is referred to as the riser. This is the part where the grip is and the arrow support. Attached to this are two limbs; just as with the recurve bow. However, the big difference is the cams which are situated at the end of these limbs.
A single cam bow is recommended for anyone new to shooting with a bow; this is a single wheel at the top and bottom of the bow. The string starts in the middle of one cam; goes to the other end of the bow and round the cam before coming back and around the original cam. It then finishes in the middle of the second cam.
It is possible to have more than one cam or different size cams once you have gained experience in using the bow. It is these cams which will effectively hold the bow in the drawn position once you have drawn it.
This is excellent when hunting as you may need to stand with the bow drawn for a period of time waiting for an animal to move into the right position.
Every bow needs a good quality string; man-made ones are best as they will not stretch and cause a loss of tension and firing distance.
Your bow will also have an arrow rest, sight, cable guard (to keep the cables away from the bow and interfering with the arrows flight path). There is also a space available to add different stabilizers to your bow.
To Set up Your Bow
There are several important steps to follow when setting up your bow and getting ready to hunt. It is important to realize that once the bow is set up it remains strung; your carrying case should accommodate it in this form. The basic bow should arrive set up ready for your additional and adjustments:
Sight
Having an accurate sight will make it much easier to hit your target. The sight is mounted off the riser and will take several rounds of shooting to get accurate; it is best to do this over several days to avoid fatigue.
Hunters generally use simple sights known as pin sights. These are plastic circles with three pins in side; each with a different color. In essence lining up the pin with your target will be all that you need to do.
The first step is to simply bolt the sight to the bow in the place indicated. Most experts will advise you to leave the bolt overnight and then retighten the sight. You will then need to pick a good target which will take multiple hits. Each of the pins represents a distance.
The first pin is for your shortest distance, usually twenty yards. Simply aim with the pin and shoot the target. You can then adjust the pin up or down the bow according to where the arrow landed.
If the arrows are landing too high the pin needs to be moved upwards. You can also move it to the left and right to ensure perfect accuracy.
The second pin is set in exactly the same way and generally set for thirty yards. Finally, you can do the third pin, whilst the procedure is the same it is important to only move the pin up and down on this one and not the sight box as you will have done on the first two.
You can add additional pins to enable you to shoot even further; depending upon your confidence, skill level and bow strength.
Stabilizer
This is a small rod which can be screwed to the front or the back of the bow. The idea is to add weight to the bow to help ensure a smoother and more accurate shot. It does this by moving the centre of gravity on your bow.
It is advisable to try out a variety of stabilizer combinations at your local club before you invest in any. This is because some people find that they make no difference to their shooting ability. In general you will need to choose between the following systems:
- BalancedThis means adding a long stabilizer on the front of your bow and a short one on the back, (the side facing you). The idea is that your bow will be perfectly balanced with no pull in any direction giving you the best possible shooting accuracy. However, these stabilizers are large and cumbersome when trying to hunt.
- ResistanceThis system uses a long forward bar and a side bar. The idea is to generate a downward pull which will help to ensure consistent bow release and therefore target accuracy.
There are many other combinations which is why it is essential to test what works best for you, a stabilizer should reduce the vibrations in the bow and help to keep the bow quieter. They also prevent the bow from twisting as you release and keep your bow balanced. For hunting it is best to have a smaller stabilizer as this is easy to maneuver in the woods.
Tuning
You will now be ready to fine tune your bow before going hunting. This is an important step to ensure you bow is not only performing at its best but that you will be able to fire an arrow accurately and consistently.
Before you can start tuning your bow you must ensure you have installed all your accessories. There is little point in getting it all just right and then changing something on the bow! Once this has been done there are several key items which must be completed:
- Arrow restThis should already be fitted to your bow. However, it is important it is lined up properly with the notch on the string where the arrow sits. Correct alignment ensures your arrow leaves the bow in a straight line and increases the chances of you hitting the desired target. A bow square is an ideal tool to assist with this.
- ArrowsThere are different length arrows available. You need one that will extend past the riser when you are on full draw, but it should not extend to far past. If your arrow is too short or too long you will struggle to tune your bow and hit the same target every time.
- Test your BowTo do this you need to place a piece of paper into a frame, or even make a frame. This should then be sited approximately five foot in front of your target. You can then shoot your target through the paper. Try to keep the shot as close to the centre as possible. A well set up bow will leave a small hole with three evenly spaced vane marks. If it does not look like this, or you find one vane mark is particularly thick then there are several adjustments which can be made.
One potential reason is that the vane of your arrow is clipping part of your bow as you fire. The easiest way to check this is to place some chalk or lipstick on each of the vanes before you fire the arrow. After firing you will be able to see where it has touched the bow by the mark left on the bow. This should be fixed by simply adjusting the arrow rest.
Alternatively you may find that the timing of the cams on your bow is not quite right. This will need adjusting.
It is also possible that the mark in your paper is larger on one side than on the other; this indicates that your arrow is wobbling during flight and is often a result of using arrows which are either too heavy or too light for your bow.
After you have completed the adjustments and tested again you can complete a follow up test from a greater distance. If the problems are still present you can make further adjustments, but, you need to make very small adjustments to compensate for the greater distance the arrow is flying over. Good sized holes every time in your paper indicate a well tuned and balanced bow; you will then be able to concentrate on hitting the target every time.